Game Introduction – Another Case Solved
Another Case Solved is a match-3 puzzle game developed by Ars Thanea Games. In this game, you’ll solve cases as a private investigator by completing different types of puzzles. Gamezebo’s quick start strategy guide will provide you with detailed images, tips, information, and hints on how to play your best game.
Quick Start Guide
Getting Started

- Another Case Solved can be downloaded by clicking the “Available On” option at the top of this page.
- When you first open the game, you will have to accept EA’s terms of use. If you don’t accept the EULA you cannot play.
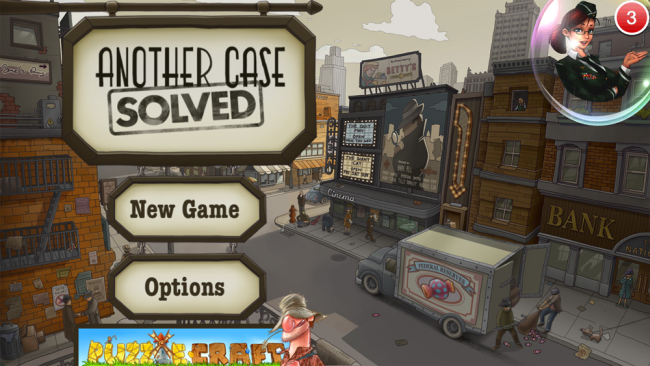
- Before starting, you can choose between New Game and Options, or a few advertisements strewn about the main menu.
- The Options menu allows you to turn sound effects and music on or off, view the credits, change the language (between English and Polish), sync your saved data with iCloud, specify notifications, and review the EA terms of use.
- You can only have one game saved at a time, so quitting will change “New game” to “Continue.” You can start a new game only by deleting your saved data.
- Starting a new game will send you to a short, skippable cutscene and then the unskippable tutorial.
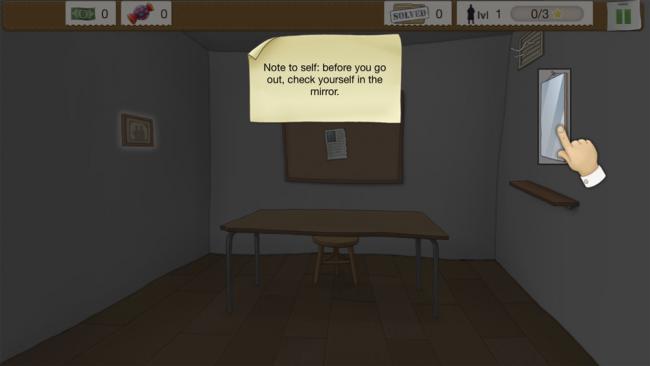
- You’ll be shown your (crummy) office and asked to tap on the mirror. In this menu, you’ll create your character’s appearance and give her a name. You can change both your appearance and name at any time later in the game, so don’t worry if you make a choice you don’t like.
- However, you cannot change your gender after this tutorial, and some items are gender-specific: e.g., you won’t have the option of mustaches for a female detective. Some events are also gender specific, such as characters asking you on dates.
- During the tutorial, you’ll be walked through four different cases. Each one will introduce new elements and puzzle types gradually. After the fourth case, you will have some freedom to progress as you’d like. You have to complete the tutorial in full as the game demands: when it asks you to buy a piece of furniture, you have to buy that furniture.
The Story
- In Another Case Solved, you’ll take on the role of a rookie private investigator who’s trying to make a name for him/herself. You’ll do this by solving crimes that are presented as individual cases.
- The town you live in is currently under a sugar ban, which makes all sweets illegal. Most cops are busy arresting people for sugar offenses, so your services will be in high demand.
- As you take on new story-based cases, you’ll meet recurring characters and some plot threads that interweave. Each case is its own story, but they all add up to create the cast and general direction of the game.
- The gameplay itself is made up of four different types of puzzles, as well as light sim elements such as purchasing furniture for your office.
How to Play
- The main gameplay of Another Case Solved is match-3, but there are a total of four puzzle types that appear frequently throughout the game. The gameplay you’ll experience depends on the case type.
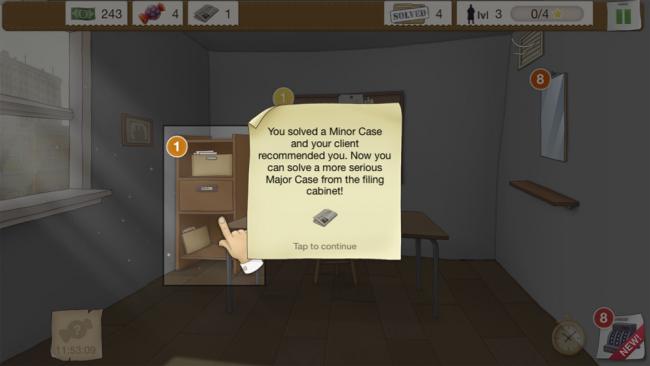
- There are two different types of cases that make up the majority of Another Case Solved‘s gameplay: minor and major. Minor cases are found in the newspaper and only feature match-3 puzzles. Major cases are found in the filing cabinet. These are story- and character-related and contain all four puzzle types.
- You can take on minor cases any time there is a newspaper available in your office. Simply tap on the newspaper; it will show you the request and cash reward in the bottom right corner. Tap again to accept the case. You’ll be sent directly to a match-3 board.
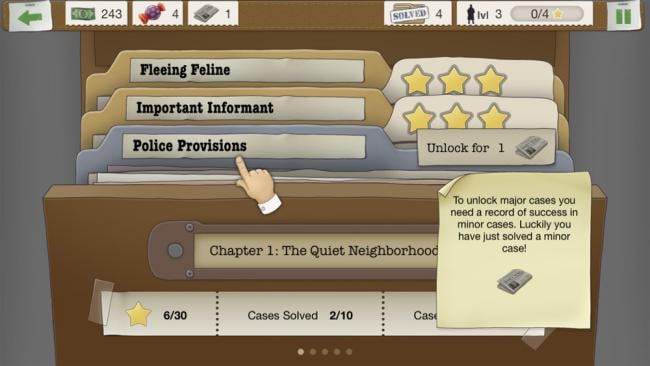
- You can only take on major cases by unlocking them with “newspapers”—that is, completed minor cases. You’ll have to complete multiple minor cases for each major case. To select a major case, tap on the filing cabinet in the upper left corner of your office.
- For both types of cases, the first thing you’ll do is play the match-3 board.
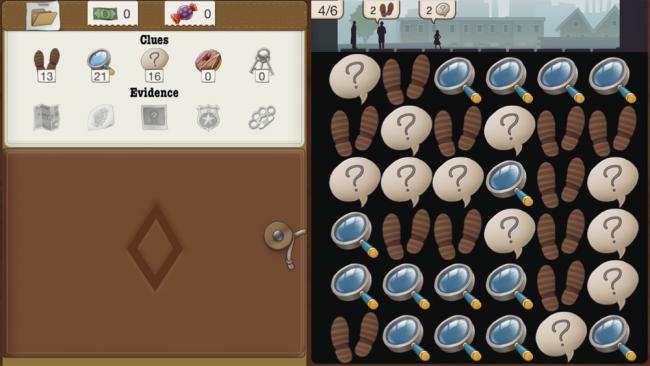
- Puzzle Type #1 – Clue Match-3: This is the primary puzzle in Another Case Solved. It plays very similarly to the match-3 boards in Puzzle Craft.
- To make matches, you drag your finger along like items that are touching. You can drag in any direction and collect as many items as you like, but they must be 1) the same type of item and 2) adjacent to each other. Dragging across items highlights their like matches and draws a line between them as you progress.
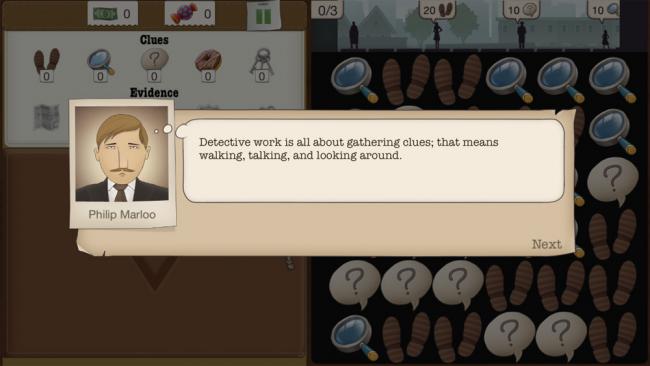
- The items on the puzzle board are CLUES. CLUES include footprints, magnifying glasses, question marks, donuts, and lockpicks.
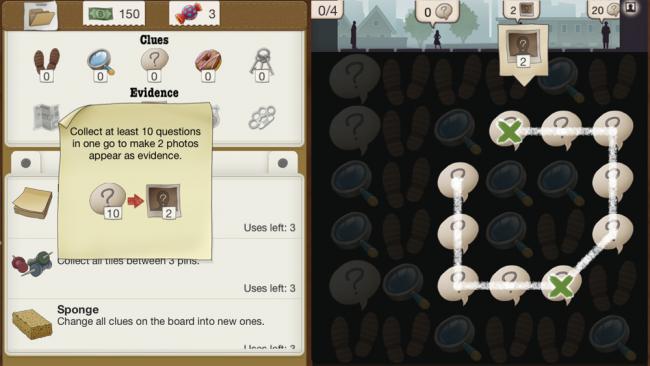
- If you match five of the same type of CLUE in one turn, you will create its corresponding EVIDENCE. EVIDENCE includes maps, fingerprints, photographs, police badges, and brass knuckles.
- Matching an item type removes the matched items from the board, replaces them from the top, and adds the amount collected to your total.
- On the left side of the match-3 board you can see the total CLUES you have collected within each category. Below the CLUES are the EVIDENCE that they turn into and how many of those you have collected. So, for instance, footprints turn into maps, so they appear in the same column.
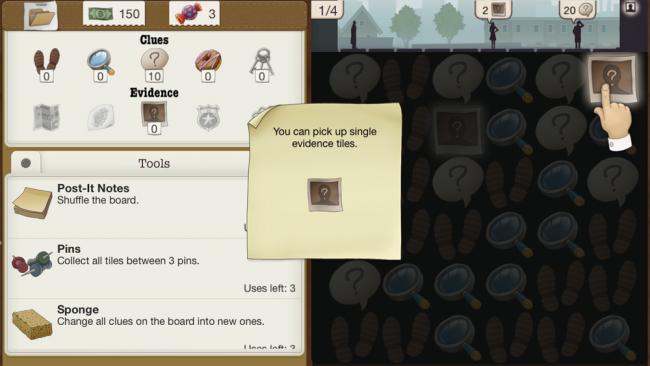
- You can only collect CLUES in sets of three or more. But you can collect individual pieces of EVIDENCE by tapping on them, or you can match EVIDENCE in sets as you do with CLUES.
- During the match-3 gameplay, your detective is canvassing the street, asking neighbors for information. You can see him at the top of the screen as a black silhouette.
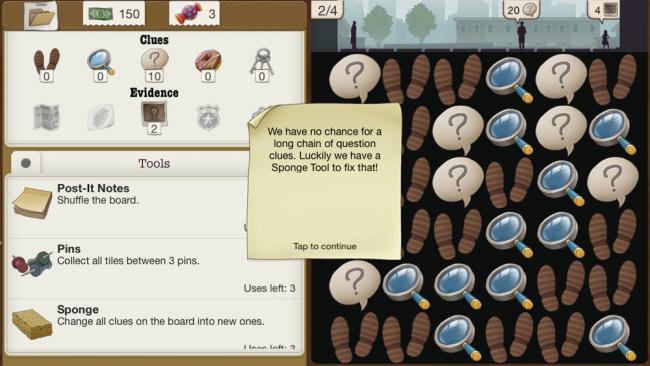
- The next witness to be interrogated is also displayed as a silhouette, with a speech bubble above their head. This bubble contains a number and icon: it shows what they need in order to answer your questions.
- In the image above, the next witness wants 20 question marks. The witness after them wants four photographs. Witnesses want both CLUES and EVIDENCE so you may need to provide one or the other at any time.
- Every time you match items within the puzzle, they are subtracted from that witness’s requirements—but only if it’s the correct item. If someone wants footprints and you match donuts, their number will remain unchanged.
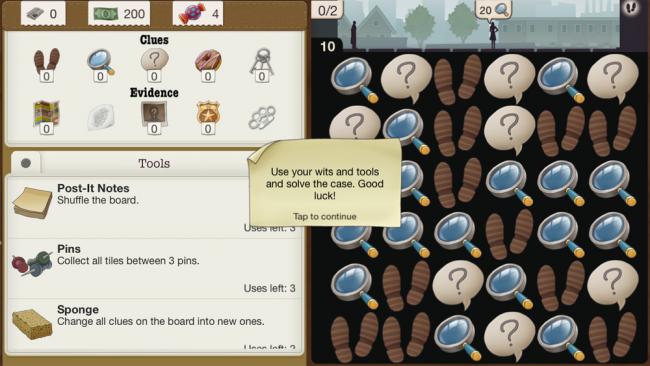
- Every time you make a match it also counts as a turn. There are a limited number of turns, dependent on the board itself, and these are visible in the upper-left corner of the board near your detective’s feet.
- In the image above, we have 10 turns left.
- The number of witnesses left is visible above your detective. In the image above, we have satisfied zero of two total witnesses.
- To successfully complete the board, you have to satisfy all witnesses before you run out of turns.
- Each time a turn passes, the witnesses will move one step to the left. Once a witness reaches your detective, the line of witnesses will stop. You have to clear out the leftmost witness to get the line moving again.
- Once you have collected all the items a witness wants, they will disappear. If it was the first witness in line (closest to your detective), the next witness will step onto the street from the right.
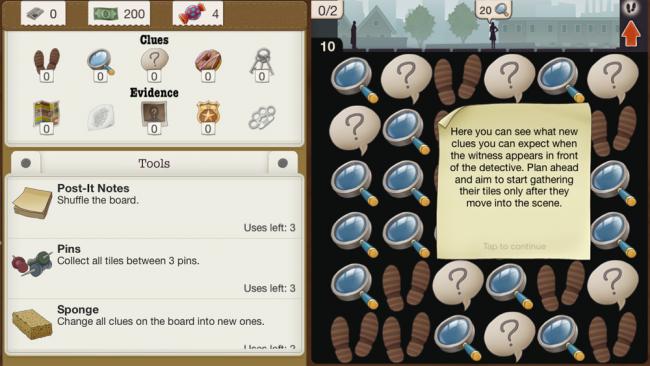
- You can see what the next three witnesses want on the upper-right corner of the screen. It will only display the type of item, though, not the amount. As the line dwindles, there may only be one (or no) icons in this space, since all witnesses will be visible on the street.
- There may be multiple witnesses on screen at a time. When this is happening, you can match any of their items and it will count towards their respective scores. Matching items for the “on deck” list on the right will not count.
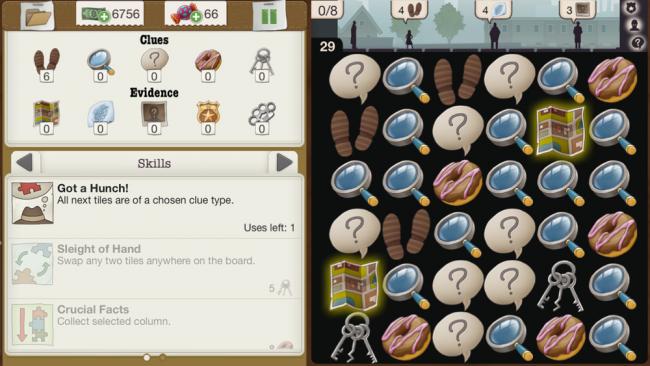
- SKILLS and TOOLS are accessible from the bottom-left menu. Tap the arrows to switch between SKILLS or TOOLS. Drag up and down to view the full list of items available to use.
- SKILLS are abilities your detective has learned through leveling up. They will either have per-case usage (“Can use once per case”) or will cost CLUES or EVIDENCE you have collected within the case to use. For instance, the SKILL “Crucial Facts” allows you to collect an entire column and costs eight donuts from the CLUES you’ve collected so far.
- If you don’t have enough CLUES collected to use a given SKILL, it will be grayed out.
- There are also passive SKILLS that are inherent to your detective. These are always in use and will not show up in this menu, such as the ability to match footprints and maps together.
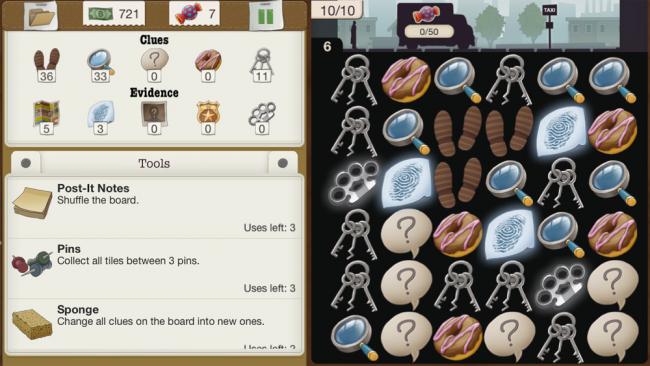
- TOOLS are single-use items that you will have to purchase from the shop. Each TOOL performs a specific function, such as collecting all CLUES of a specific type or rearranging the current board.
- To use any SKILL or TOOL, simply tap on it and then tap on the corresponding item on the board if need be. Some don’t need you to tap—such as “collect all” TOOLs—while others do—such as “collect a specified column.”
- Successfully completing Puzzle type #1 – Match-3 by appeasing all witnesses within the turn limit will result in two different things:
- In minor, newspaper cases, all EVIDENCE left on the board will turn into coins and you will get to use up any remaining turns making additional matches.
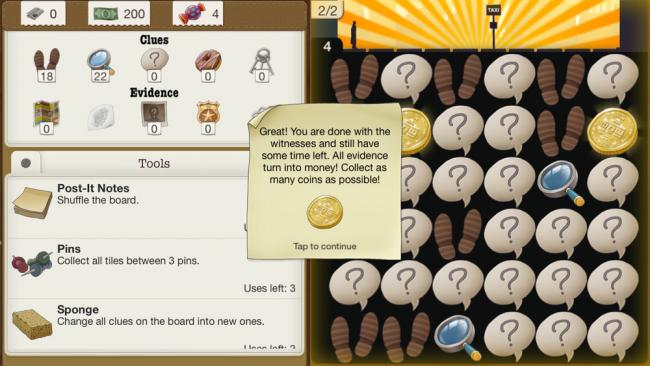
- If you match five or more items in this “bonus cash” turn, you will get coins. Matching ten coins will create one candy. All coins are worth two “detective bucks,” the cash currency. After this bonus round, you’ll return to your office.
- In major, story-related cases, you will get a chance to make more EVIDENCE to fill the quota for the case. If you complete this, a candy truck will appear that awards one candy for every 50 items you match. After this, you’ll move onto the next puzzle type.
- Puzzle types 2, 3, and 4 only appear in major cases. The order you’ll complete them in depends on the case. Puzzle type #1 always comes first, but otherwise, the order is different and fixed per case.
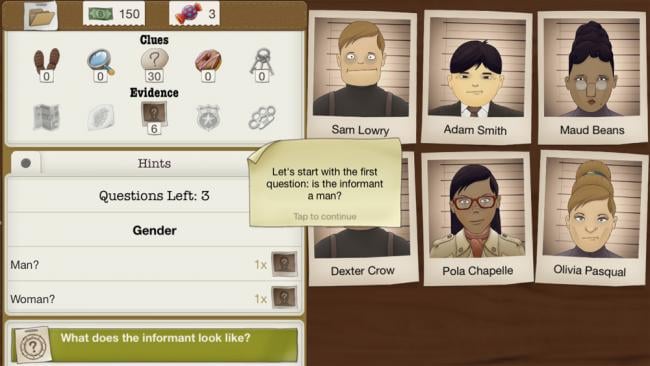
- Puzzle type #2 – Suspect Identification: In this puzzle, you’ll narrow down potential suspects by asking questions about their appearance.
- The number of photographs you collect in the match-3 section will determine how many questions you get to ask. Asking questions costs photographs, and the price goes up with each question.
- You’ll be presented with a set of pictures, each one depicting a different person. On the left-hand side of the screen you can scroll through the potential questions, such as “Man?” or “Woman?”, “Hair: Black?” “Height: Short?” etc.
- When you tap on a question, it will be replaced with a “Yes” or “No” answer. You’ll then need to exclude suspects based on what you’ve learned. To exclude a suspect, simply tap on their photo—it will flip over and be marked “rejected.”
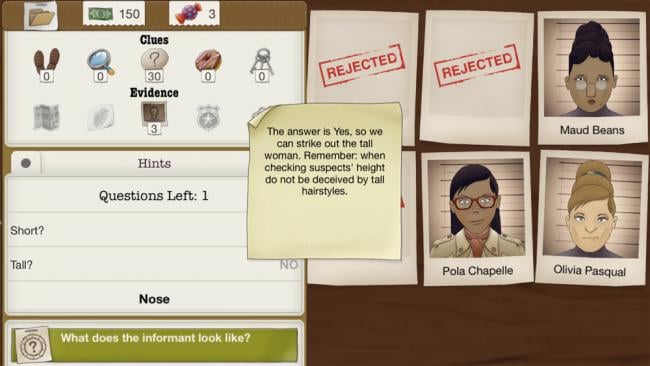
- If you accidentally tap on the wrong photo, just tap it again to flip it back.
- Once you’ve narrowed down the choices and know who the suspect is, tap on the green button on the bottom-left side of the screen and then tap on the correct photograph.
- If you tap on the green button too early, just tap it again to go back to the search.
- You don’t have to “reject” everyone or even anyone—if you know who the suspect is (such as while replaying a case) you can immediately tap on the green button and then their photograph. The reject option is just to help you narrow the field.
- As with the match-3 portion, you will likely have TOOLS and SKILLS available to help you narrow down the options. Tap the arrow above the list of questions to access these helpers.
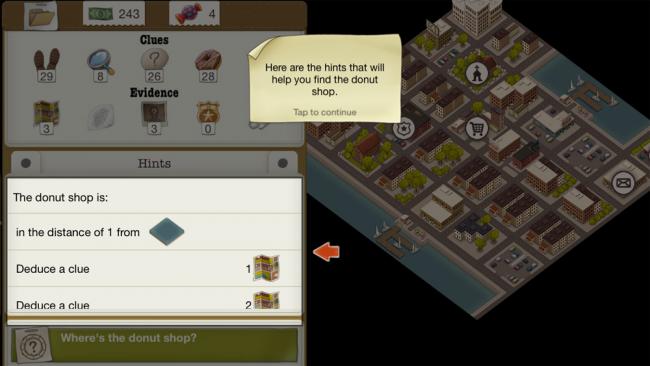
- Puzzle Type #3 – City Search: This puzzle puts you above a section of the city that is segmented into distinct blocks. Each block contains a building or generic type of location, such as “restaurant” or “factory.”
- Your goal is to find the one city block that corresponds with all of your hints.
- The number of maps you collect in the match-3 section will determine how many hints you get to uncover. Unlocking a hint costs a corresponding amount of maps.
- Once you unlock a hint, you can click on it to highlight related blocks on the map. For instance, if you unlocked “It’s within 1 space of water,” then all blocks within one space of water will be highlighted.
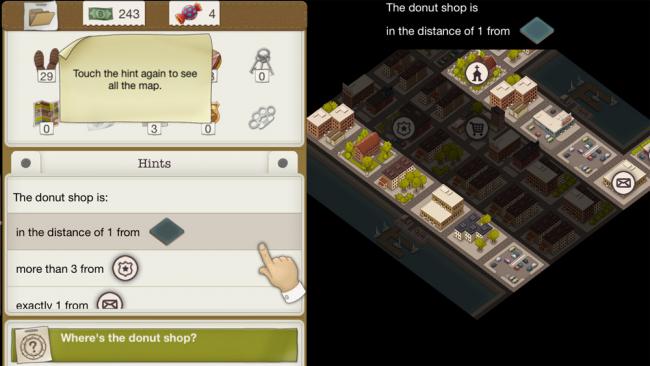
- Tapping on each clue will display its corresponding blocks. Unlike Suspect Identification, you cannot “reject” city blocks. You’ll have to remember what lights up and what does not in between clues. The correct block will be one that is highlighted when each clue is displayed.
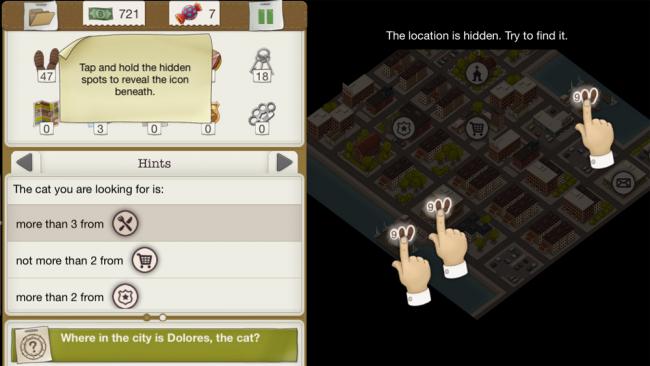
- There will also be hidden locations on the map marked by footprint symbols. You do not know what type of location this is or if it relates to one of your clues until you uncover it. To uncover it, hold your finger down on the block until the green timer fills. After it’s filled, the footprint will be replaced by the location’s symbol (such as a coffee cup for a café).
- Uncovering locations costs nine footprints. These are deducted from the CLUES you collected during the match-3 portion. So collecting lots of footprints means you can uncover more locations.
- You can move around the map by dragging and zoom in and out by pinching (but you can’t zoom very far).
- Once you think you know which block is correct, tap the green button in the bottom-left corner and then tap on the block itself.
- There are SKILLS and TOOLS available to help you and these are accessible by clicking the arrows above the hints list.
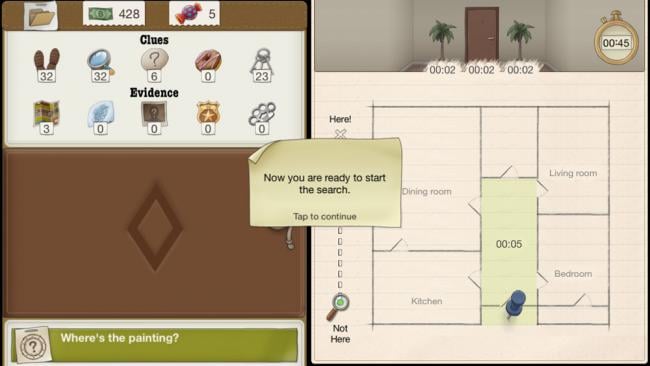
- Puzzle Type #4 – Crime Scene Investigation: This puzzle places your detective in a loose blueprint of a house or building. She must explore rooms in search of a specific item or clue.
- The crime scene investigation plays out like a game of “hotter/colder.” When you move closer to the correct room (that houses the item in question) you will be told “Closer” in green. When you move to a room that’s farther away, you’ll be told “Farther” in red.
- Your detective’s “intuition” bar is determined by how many fingerprints you collected during the match-3 section. Collecting all the fingerprints needed will max your intuition and she will know the correct item when she sees it. Not having enough fingerprints will give you less intuition, and even when you find the right item she won’t know for certain. In these instances, you will be told to “Take a guess” once you’re near the right item.
- You’ll have a certain in-game time limit to explore the building, usually about 50 minutes. Time only moves when you do: entering a new room takes five minutes, while examining the objects in that room takes two minutes. Examining items within objects takes one minute per item. Returning to a room you’ve already visited, or re-examining an item you’ve already examined, takes no time.
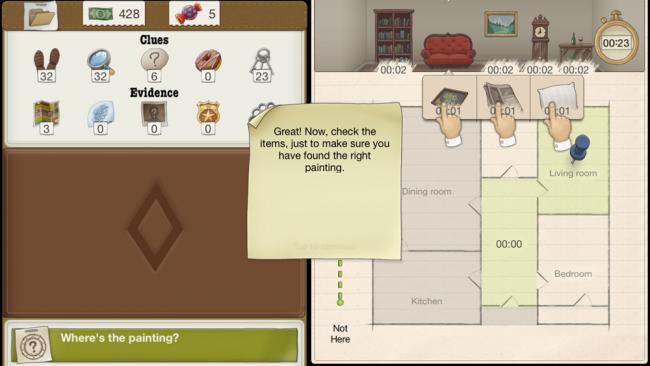
- The objects inside a room are visible at the top of the screen. To open/examine one, tap on it and hold down while the green timer fills. This is also how you move between rooms.
- Once you have found the correct item—or believe you have—tap on the green button on the bottom-left and then tap on the item itself.
- There are SKILLS and TOOLS available to help you and these are accessible on the left-hand side of the screen.
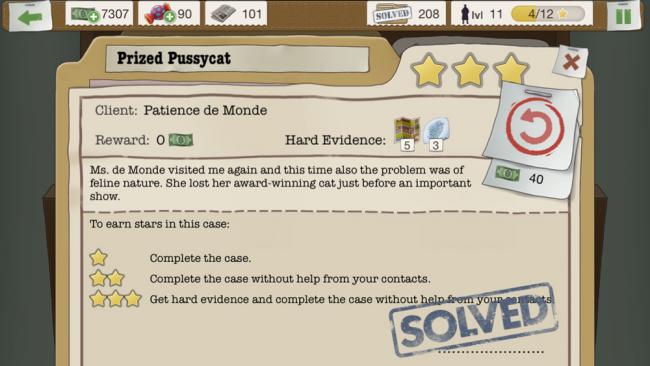
- Completing a Major Case: Once you’ve successfully completed all four puzzle types, you will solve the major case. This resolves the plot thread, marks the case as completed, awards you cash, and also awards you stars based on how well you did.
- Most cases have the same requirements for three stars: “Complete the case” – this just means finish the case without failing.
- “Complete the case without help from your contacts” – if you fail one of the puzzles other than match-3, you will be offered help from your friends. This usually costs cash or candy but allows you to continue. This star requirement means you cannot fail any puzzle type.
- “Get hard evidence and complete the case without help from your contacts” – this is the same as above, but with the added stipulation of “get hard evidence.” This means you must collect all the EVIDENCE required during the match-3 portion. Once you finish the match-3 portion and a checkbox appears with the total amount of EVIDENCE you need for that case, you’ll need to get all of the EVIDENCE listed in order to earn three stars.
- Stars are used to level up your detective and teach her new SKILLS.
- Leveling up gives you bonus candy and unlocks new items you can buy.
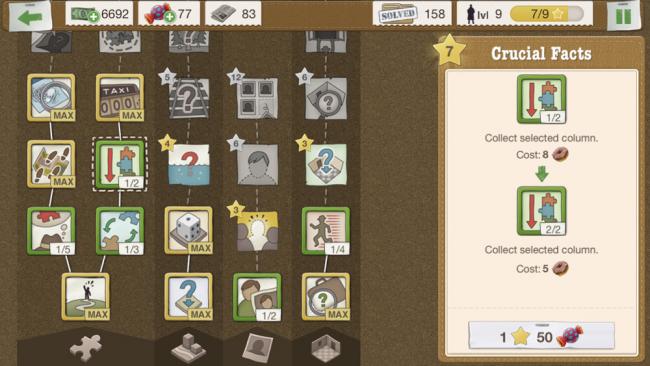
- The SKILL Tree: SKILLS are taught via the bulletin board in your office. These are what you’ll use within puzzles to make them a bit easier.
- Each branch corresponds to one of the puzzle types (although match-3 has two branches). You do have to work from the bottom up, so if you want the topmost SKILL in one branch you will have to buy every SKILL below it first.
- SKILLS are unlocked at certain levels, which is visible by tapping on their icon on the tree. The amount of stars they cost to purchase is also listed here.
- Some SKILLS have multiple levels. These will be marked with a “1/2” type denotation. SKILLS you’ve purchased all levels for will say “MAX.” Most SKILLS’ first level only costs stars, but later levels cost stars and candy.
- Cash and Candy: Cash and candy are the two primary currencies in Another Case Solved. You’ll earn cash often by solving cases. Candy is slightly harder to come by and acts as the “premium” currency. Both are used to purchase FURNITURE, EQUIPMENT, and TOOLS.
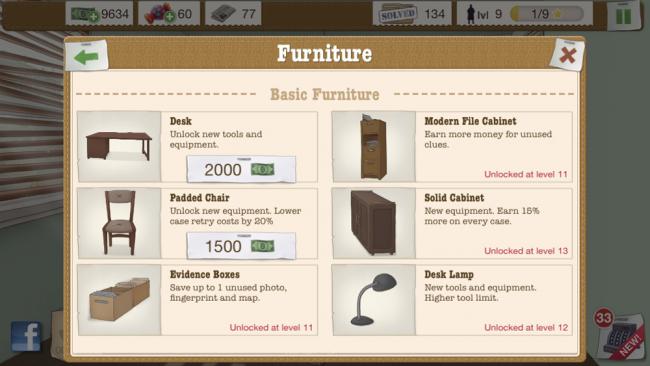
- FURNITURE and EQUIPMENT: You can buy FURNITURE and EQUIPMENT for your office by clicking the cash register icon in the lower-right corner.
- FURNITUREdecorates your office but it also has functional uses: each piece of FURNITURE does something different, but the results are usually permanent benefits, such as unlocking new EQUIPMENT or increasing the amount of cash you earn per case.
- EQUIPMENT also decorates your office, but it has more tangible results on cases. Most EQUIPMENT either awards you a bonus TOOL within each case, or acts as a more reliable candy hotspot.
- TOOLS you use within cases are also purchased from this shop menu. You can also choose to paint your office—which is purely aesthetic—or buy in-app purchases at the bank. (The bank also lets you exchange candy for cash.)
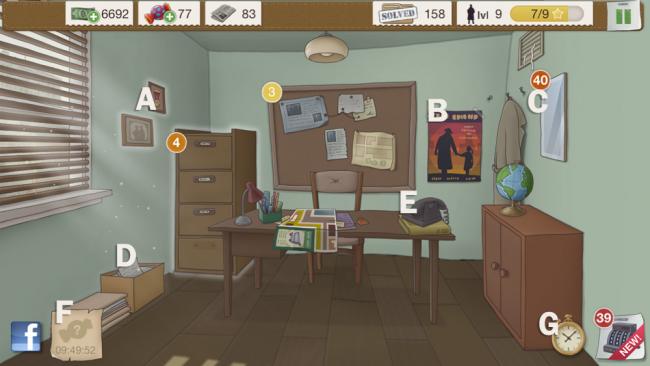
- Other Office Features: As you buy new FURNITURE, your office will fill up. Items that are interactive will glow with a soft white light. The other things you can do include:
- A) Review your achievements via the diploma wall.
- B) Share your stats on Facebook via the film poster.
- C) Change your appearance and name at the mirror (but not gender).
- D) Review your stored EVIDENCE via the evidence boxes.
- E) Watch video ads on your telephone to earn candy.
- F) Hunt for candy by tapping on the candy note (when it’s active).
- G) View the remaining time before newspapers, candy, or other items are delivered by tapping on the timer. (And opt to deliver them immediately by paying candy.)
- The colorful numbers on some items indicate how many new objects are available. E.g., 40 on the mirror means 40 new clothing items have been unlocked and can be purchased. The four on the filing cabinet means four new, unsolved cases.
Hints and Tips
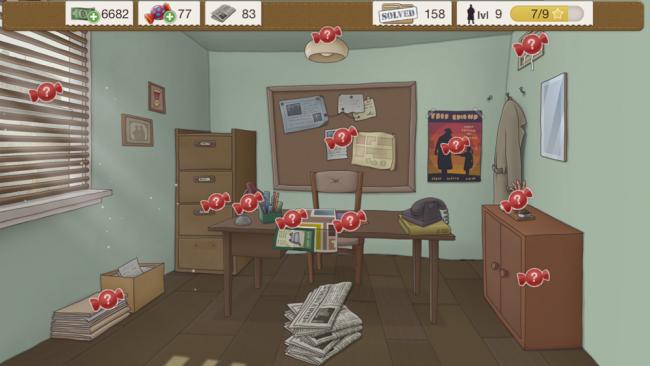
- Invest in newspapers. You can only play minor cases if there is a newspaper in your office. Newspapers are delivered one every 30 minutes. You can only have three newspapers stacked in your office at a time: this means if you don’t play for two hours, you’ll return to three newspapers. If you don’t play for nine hours, you’ll still return to three newspapers. If you only make one in-app purchase, make it the “Subscription.” This increases the newspaper limit to five, thus increasing the amount of time you can play by quite a bit.
- When you reach a new level, you’ll receive a full stack of newspapers. If you’re about to start a major case and are close to leveling up, finish up all your newspapers to make the most of this.
- And furniture. Buy FURNITURE as soon as possible. A lot of really useful TOOLS and EQUIPMENT are unlocked by buying FURNITURE, and you’ll be able to search for candy on any new FURNITURE items.
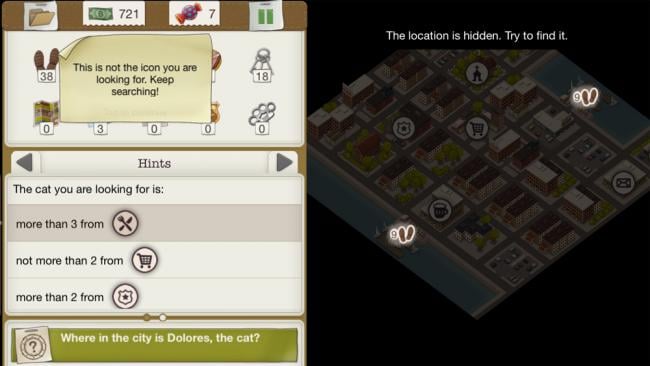
- Stay alert during City Search. The TOOLS used in the city search section are unlocked by finding them within the city search maps themselves. If you have extra footprints at the end of a search—i.e., you know where the location is but haven’t tapped on it yet—use those footprints to uncover hidden locations. This will help you unlock the critical tools faster.
- Many of the city search TOOLS uncover “all” buildings of a certain type. Because of this, you will only ever need a maximum of one of each type of tool per case. Most cases only feature one or two types of buildings in the clues, so many of your TOOLS will go unused. Don’t waste money buying more than that; just restock your one of each kind as needed.
- Types of buildings typically look the same and as you’d expect in real life. Factories are always black-roofed smokestacks while ports are always boat-heavy docks on the water. If you’re trying to uncover a certain type of location, think about what it might actually look like.
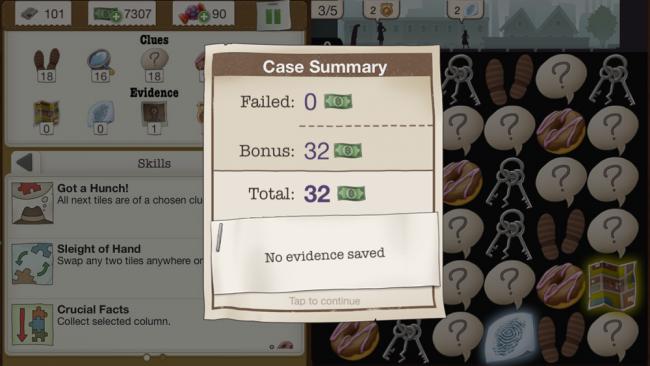
- Use minor cases to build up cash and candy. During major cases, focus on getting three stars. Minor cases and their bonus round are a great way to build up a cash reserve.
- Don’t waste TOOLS or candy continues on minor cases. If you fail a newspaper case, just exit and try another. You’ll still earn some money for it.
- At the end of both types of cases, you will earn cash for unused CLUES. Unused CLUES are ones you collected but did not spend on SKILLS. (So, for instance, if you finished the match-3 board with 18 footprints but uncovered two blocks in city search, you’ll end up with zero footprints.)
- Buying new filing cabinets will increase the amount of money you’ll earn for these unused CLUES. Each type of CLUE is worth a different amount, but once you have the upgraded filing cabinet, you’ll be earning about $1 for every two footprints, question marks, or magnifying glasses. Donuts and lockpicks are worth slightly less, closer to $1 for every five. So, near the end of your case, if you have a choice between matching lockpicks and donuts or one of the other CLUE types, opt for the latter for more money.
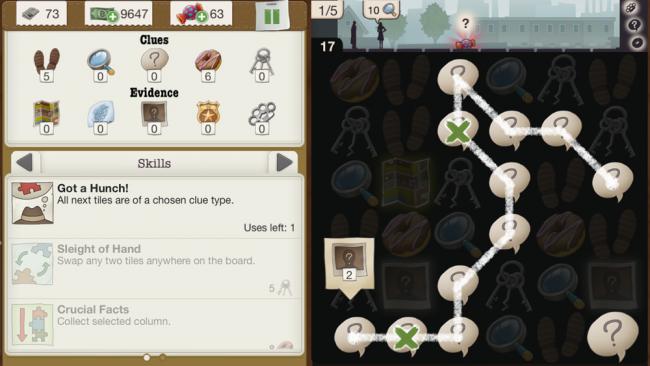
- Pay attention to how you’re matching. CLUES stack, so matching ten of a single CLUE will create two pieces of EVIDENCE.
- There are passive SKILLS that let you collect EVIDENCE with their respective CLUES: for instance, maps and footprints together. However, matching five of these together won’t form new EVIDENCE, and even if you match five footprints, if a single map is included, you still won’t get new EVIDENCE. Hold off on using this ability until the end of the board when you’re just picking up EVIDENCE and not trying to create it.
- Matching three pieces of EVIDENCE creates a “Bonus” tile. Whatever you match this “Bonus” tile with will give you twice as many items collected. E.g., four footprints become eight footprints. Note this does not affect EVIDENCE creation. You won’t magically get a map out of four footprints.
- You can undo a match-3 move by dragging your finger back to the first item. But you can’t undo tapping on a single piece of EVIDENCE: be sure you want to collect that EVIDENCE before tapping.
- The “free tool per case” EQUIPMENT types are a bit confusing. This doesn’t actually give you a free tool to your inventory per case. It just adds “+1” to that tool for each case. So, if you have zero sponges and equip the “free sponge per case” EQUIPMENT, you will still have zero sponges in the next case—but will be able to use the sponge one time. If you don’t use the sponge, you won’t leave with one in your inventory.

- Stakeout the case beforehand. You can see what EVIDENCE is needed to three-star a case on the case folder in the filing cabinet. Before starting a case, check the EVIDENCE, and then equip the items that will be most helpful. For instance, if the case is photograph-heavy, equip the “one free photograph per case” EQUIPMENT.
- If you find yourself with extra time in the crime scene investigation, examine random objects. Many of them contain candy.
- Sometimes a piece of candy will randomly appear on the street during the match-3 puzzles. Once you’re within one turn of the candy, it will tell you what you need to collect it. You’ll only have one turn to appease it, so this is a good time to use your TOOLS. Note: the candy is optional to the case and if you don’t collect it, it will simply disappear.
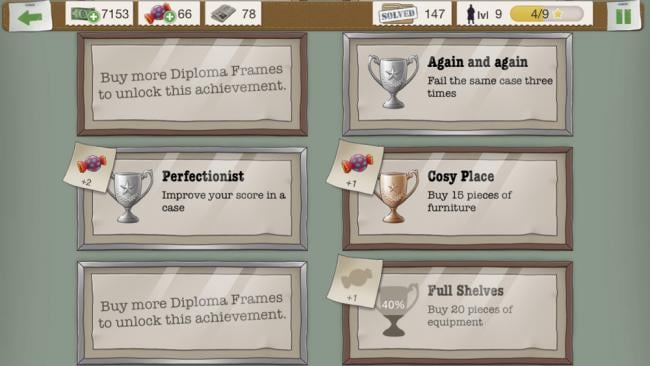
- Revisit your successes. Buy the diploma frames as soon as possible so you can start earning achievements. Check your diploma wall often; completed achievements will have candy taped to them. Tap on the achievements to collect your candy reward.
- You can replay major cases to get more stars, but you won’t earn any money for doing so.
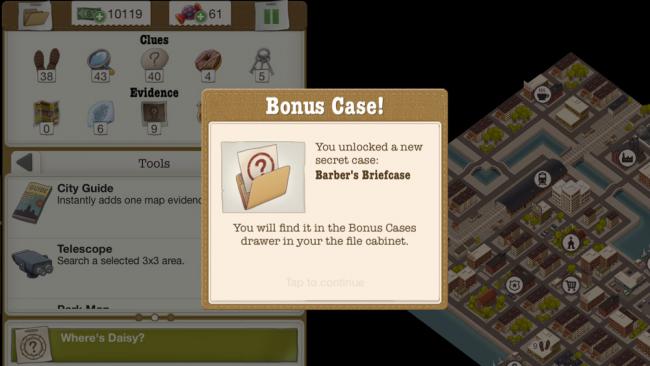
- Explore every nook and cranny. Some major cases have “bonus cases” paperclipped to them. These cases are uncovered within the major case itself: sometimes it might be an item in the crime scene investigation or a specific building in the city search. It’s usually off the beaten path from the main case so you’ll need extra time and CLUES to find them.
- One bonus case is earned by going into the Shop – Bank and selecting the “Like us on Facebook” option. You don’t have to be logged into Facebook or actually like anything to earn the case; just tapping the button awards it.
- Pay attention to what your detective or her contacts say during the case itself. Sometimes her comments are important clues. For instance, she might mention that a criminal escaped on a boat, meaning he’s probably at a port.
Congratulations!
You have completed Gamezebo’s quick start guide for Another Case Solved. Be sure to check back often for game updates, staff and user reviews, user tips, forums comments, and much more here at Gamezebo!
